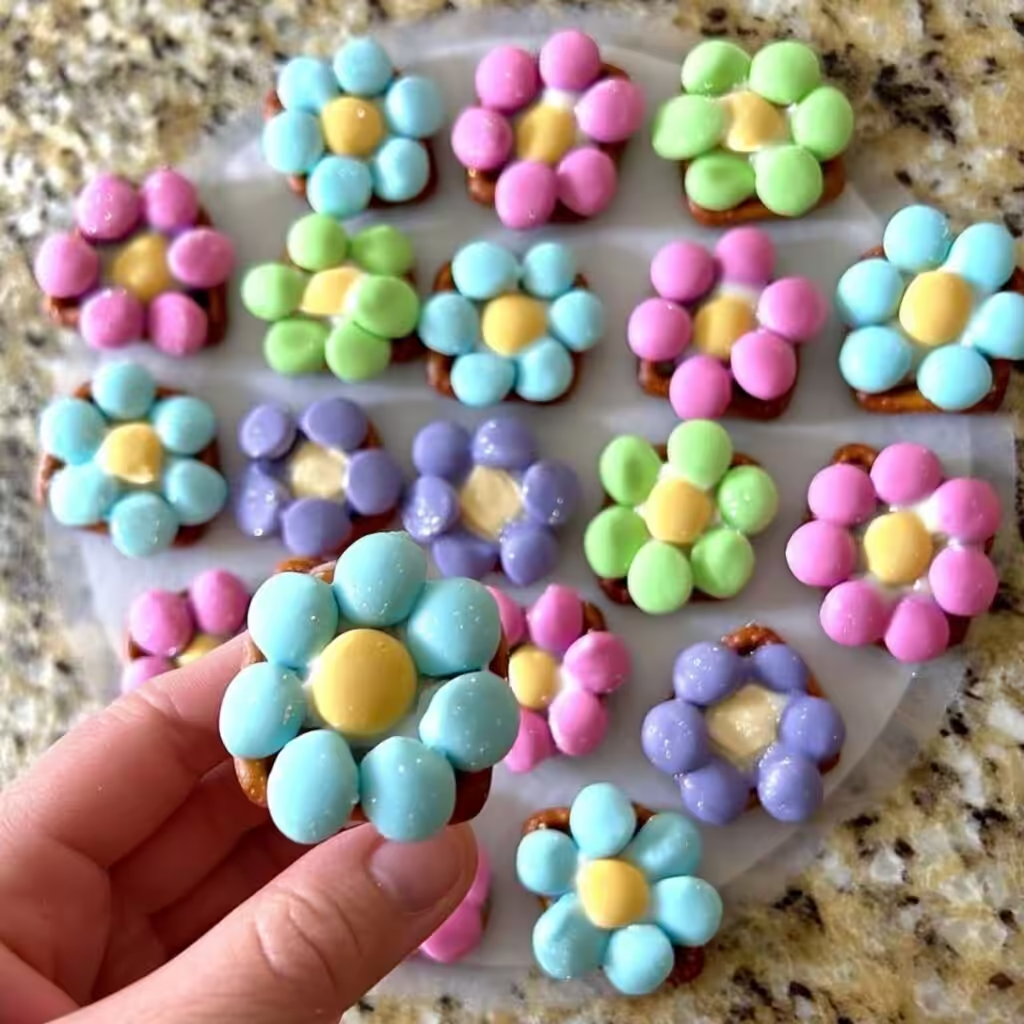
There’s something utterly charming about a dessert that looks like it took hours to create but comes together in mere minutes. Pastel Flower Pretzel Bite treats are exactly that—a delightful combination of salty, sweet, and buttery flavors, adorned with delicate floral sprinkles that make them perfect for spring celebrations, bridal showers, Easter gatherings, or simply brightening up an ordinary afternoon. These bite-sized confections have become a staple in my kitchen because they require no baking, use minimal ingredients, and always elicit the kind of delighted response that makes entertaining feel effortless.

I’ve spent years crafting no-fuss desserts that deliver maximum visual impact with minimal stress, and these pretzel bites are among my proudest creations. The foundation is simple: a sturdy pretzel base, a generous layer of smooth, pastel-colored candy coating, and a whimsical flower sprinkle that transforms each piece into a miniature work of art. The contrast between the salty crunch of the pretzel and the sweet, creamy coating is utterly addictive, while the pastel palette evokes the freshness of spring in every bite.
What makes these treats truly special is their adaptability. They’re naturally nut-free, can easily be made gluten-free, and are completely vegetarian. Whether you’re preparing a dessert table for a crowd, looking for a fun activity to do with children, or simply craving something pretty and delicious, these Pastel Flower Pretzel Bites deliver on every front.
Why This Recipe Works: The Art of the Perfect Pretzel Treat
Before we dive into the step-by-step process, let’s explore why this particular combination yields such exceptional results. The magic lies in three key elements: texture, temperature, and timing.
The Pretzel Foundation
Not all pretzels are created equal when it comes to candy coating. I recommend using small pretzel snaps or round butter-style pretzels for this recipe. Their flat, sturdy surface provides an ideal base for the candy coating, while the signature salt crystals offer that essential savory counterpoint to the sweetness. The slight depression in the center of many pretzel snaps also acts as a natural reservoir, helping the coating stay neatly in place during setting.
The Candy Coating
Candy melts or high-quality white chocolate form the canvas for our pastel flowers. Unlike traditional chocolate, candy melts are formulated to melt smoothly and set with a firm, stable finish that doesn’t require tempering. This makes them exceptionally user-friendly, especially for those new to candy-making. Their ability to hold vibrant colors without seizing or becoming grainy is what allows us to achieve that beautiful pastel hue.
The Floral Accent
The final flourish—a delicate flower sprinkle—does more than add visual appeal. It provides a subtle textural contrast and reinforces the springtime theme. The key is applying it while the coating is still wet, ensuring it adheres firmly as the candy sets.
Essential Ingredients for Pastel Flower Pretzel Bites
Let’s take a closer look at each component and understand what makes it essential.
Pretzels
Choose small, flat pretzel snaps. The classic square or round butter-style pretzels work beautifully. Avoid thick, knotted pretzels, as their uneven surface can make coating difficult. If you’re preparing this recipe for a gluten-free audience, many brands now offer certified gluten-free pretzels that perform equally well.
Candy Melts or White Chocolate
Candy melts are my preferred choice for this recipe due to their reliable melting properties and vibrant color potential. If using white chocolate, opt for a high-quality couverture chocolate and add a small amount of coconut oil or cocoa butter to ensure smooth melting. Avoid chocolate chips, as they contain stabilizers that can result in a thick, difficult-to-work-with consistency.
Gel Food Coloring
Liquid food coloring can cause candy melts to seize, so gel or oil-based coloring is essential for achieving smooth, vibrant pastel shades. A few drops go a long way, allowing you to create soft pinks, lavenders, mint greens, and buttery yellows.
Flower Sprinkles
Look for small, flat flower-shaped sprinkles in pastel shades. Avoid large or heavy sprinkles that may cause the coating to crack as it sets. If you prefer a simpler finish, crushed freeze-dried raspberries or edible glitter can create an equally lovely effect.
Step-by-Step Instructions for Pastel Flower Pretzel Bites
Creating these charming treats is a straightforward process that yields professional-looking results. Follow these steps carefully, and you’ll have a beautiful batch in no time.
Step 1: Prepare Your Workspace
Line a large baking sheet with parchment paper or a silicone baking mat. This provides a non-stick surface for setting your pretzel bites and makes cleanup effortless. Arrange your pretzels in a single layer, spacing them about half an inch apart to allow room for coating and easy removal.
Step 2: Melt the Candy Coating
Place your candy melts or white chocolate in a microwave-safe bowl. Heat in 20-second intervals, stirring thoroughly between each, until the mixture is completely smooth and melted. Be careful not to overheat, as this can cause the candy to thicken or burn. If using white chocolate, stir in one teaspoon of coconut oil to achieve a more fluid consistency.
Step 3: Add Pastel Color
Divide the melted coating into separate bowls if you wish to create multiple colors. Add gel food coloring a drop at a time, stirring until the desired pastel shade is achieved. Remember that colors will appear slightly lighter once set, so aim for a shade slightly more vibrant than your final goal.
Step 4: Coat the Pretzels
Using a small spoon or a piping bag with the tip snipped off, carefully spoon or pipe the melted coating onto each pretzel, filling the center and allowing it to spread slightly toward the edges. A small offset spatula can help create a smooth, even surface. Work in small batches to ensure the coating remains fluid.
Step 5: Add the Flower Sprinkles
Immediately after coating each pretzel, gently press one or two flower sprinkles into the soft candy. If you’re creating an assortment of colors, consider matching sprinkles to coating shades—pink flowers on pink coating, purple on purple—or mix colors for a playful effect.
Step 6: Set and Serve
Allow the coated pretzels to set completely at room temperature. Depending on your kitchen’s humidity, this typically takes 20–30 minutes. For faster setting, you can place the baking sheet in the refrigerator for 10–15 minutes. Once firm, carefully lift the pretzel bites from the parchment and arrange them on a serving platter.
Pro Tips for Perfect Pastel Flower Pretzel Bites
Achieving consistently beautiful results comes down to a few key techniques I’ve refined through years of candy-making.
- Maintain the right temperature: Candy melts and white chocolate are sensitive to temperature. If the coating becomes too thick while you’re working, return it to the microwave for a brief 5-second burst. If it becomes too thin, allow it to cool slightly before continuing.
- Work in small batches: Rather than coating all your pretzels at once, work in groups of 10–15. This ensures the candy remains fluid enough to create a smooth surface and allows time to add sprinkles before it sets.
- Use a piping bag for precision: If you prefer clean, uniform circles of coating, a piping bag (or a small zip-top bag with a corner snipped) offers excellent control. This technique is particularly useful if you’re creating these treats for an event where presentation matters.
- Avoid overloading with sprinkles: One or two flower sprinkles per pretzel is plenty. Overloading can cause the coating to crack as it sets and may make the final treats difficult to bite through.
Delicious Variations and Substitutions
One of the greatest joys of this recipe is its flexibility. Here are several ways to adapt it to suit different tastes, dietary needs, or occasions.
Vegan Pastel Flower Pretzel Bites
To create a vegan version, simply use vegan white chocolate or vegan candy melts. Many specialty brands offer dairy-free options that melt and set beautifully. Ensure your pretzels are vegan (most are, but it’s worth checking the label for milk-derived ingredients) and select vegan-friendly sprinkles.
Gluten-Free Variation
Certified gluten-free pretzels make this recipe entirely gluten-free. Look for brands specifically labeled gluten-free, and note that the coating and sprinkles are naturally gluten-free when made without wheat-derived ingredients.
Dark Chocolate Flower Bites
For a richer flavor profile, substitute dark chocolate candy melts or semi-sweet chocolate for the pastel coating. Top with white flower sprinkles or a light dusting of edible gold dust for an elegant, sophisticated finish perfect for adult gatherings.
Citrus-Scented Bites
Add a quarter teaspoon of lemon or orange zest to the melted coating before coloring. The bright citrus notes complement the salty pretzel beautifully and add an unexpected layer of flavor.
Holiday Color Themes
While pastels are perfect for spring, this recipe adapts beautifully to any holiday. Use red and green for Christmas, pink and red for Valentine’s Day, or orange and black for Halloween. The flower sprinkles can be swapped for themed sprinkles—hearts, stars, or seasonal shapes.
Mini Pretzel Flowers
For a more delicate presentation, use mini pretzel twists and a smaller amount of coating. These petite versions are perfect for cookie exchanges or as accompaniments to afternoon tea.
Storing, Gifting, and Make-Ahead Tips
These pretzel bites are wonderfully forgiving when it comes to storage and make-ahead preparation.
- Room temperature storage: Store finished pretzel bites in an airtight container at room temperature for up to two weeks. Avoid refrigeration if possible, as moisture can cause the coating to soften or become sticky.
- Freezing: These treats freeze beautifully. Arrange them in a single layer in a freezer-safe container, separating layers with parchment paper. They’ll keep for up to three months. Thaw at room temperature before serving.
- Gifting: Arrange pretzel bites in decorative boxes or cellophane bags tied with ribbon. They make thoughtful homemade gifts for teachers, neighbors, or party hosts. Include a small note with ingredient information if gifting to someone with dietary restrictions.
Troubleshooting Common Issues
Even with the simplest recipes, occasional challenges arise. Here’s how to address the most common issues.
- Coating too thick: If your candy coating is thick and difficult to spread, stir in one teaspoon of coconut oil or vegetable shortening. Heat briefly and stir until smooth.
- Coating cracks after setting: This typically indicates that the coating was applied too thickly or that the pretzel base was too cold. Allow your pretzels to come to room temperature before coating, and apply a moderate, even layer.
- Sprinkles falling off: Sprinkles must be applied while the coating is still wet. If they fall off after setting, gently dot the back of each sprinkle with a small amount of melted candy and reposition.
- Colors bleeding or streaking: This occurs when the coating is too warm when colored. Allow it to cool slightly before adding gel coloring, and stir thoroughly to ensure even distribution.
Frequently Asked Questions
Can I use traditional chocolate chips instead of candy melts?
While possible, chocolate chips contain stabilizers that make them less fluid when melted. If using chips, add one tablespoon of coconut oil per cup of chips to improve consistency.
How far in advance can I make these?
These pretzel bites can be made up to two weeks in advance when stored properly in an airtight container at room temperature.
Are these suitable for children’s parties?
Absolutely. They’re a wonderful activity for kids—they can help arrange pretzels, sprinkle the flowers, and watch the colors come to life. Just supervise the melting process.
Can I make these without food coloring?
Yes. The natural white coating is elegant on its own. You can also tint the coating naturally using freeze-dried fruit powders (strawberry for pink, matcha for green) for a subtle, natural color.
Join the Conversation
I hope these Pastel Flower Pretzel Bites bring as much joy to your kitchen as they have to mine. There’s something truly special about creating treats that are as delightful to look at as they are to eat. Whether you’re preparing them for a spring celebration, a bridal shower, or simply because you deserve something beautiful, I’d love to hear how they turn out.
Share your creations in the comments below—I’d love to see your color combinations and hear about any variations you try. And if you’re looking for more no-bake inspiration, be sure to explore our collection of easy dessert recipes, including chocolate-dipped treats, festive bark, and other crowd-pleasing confections.
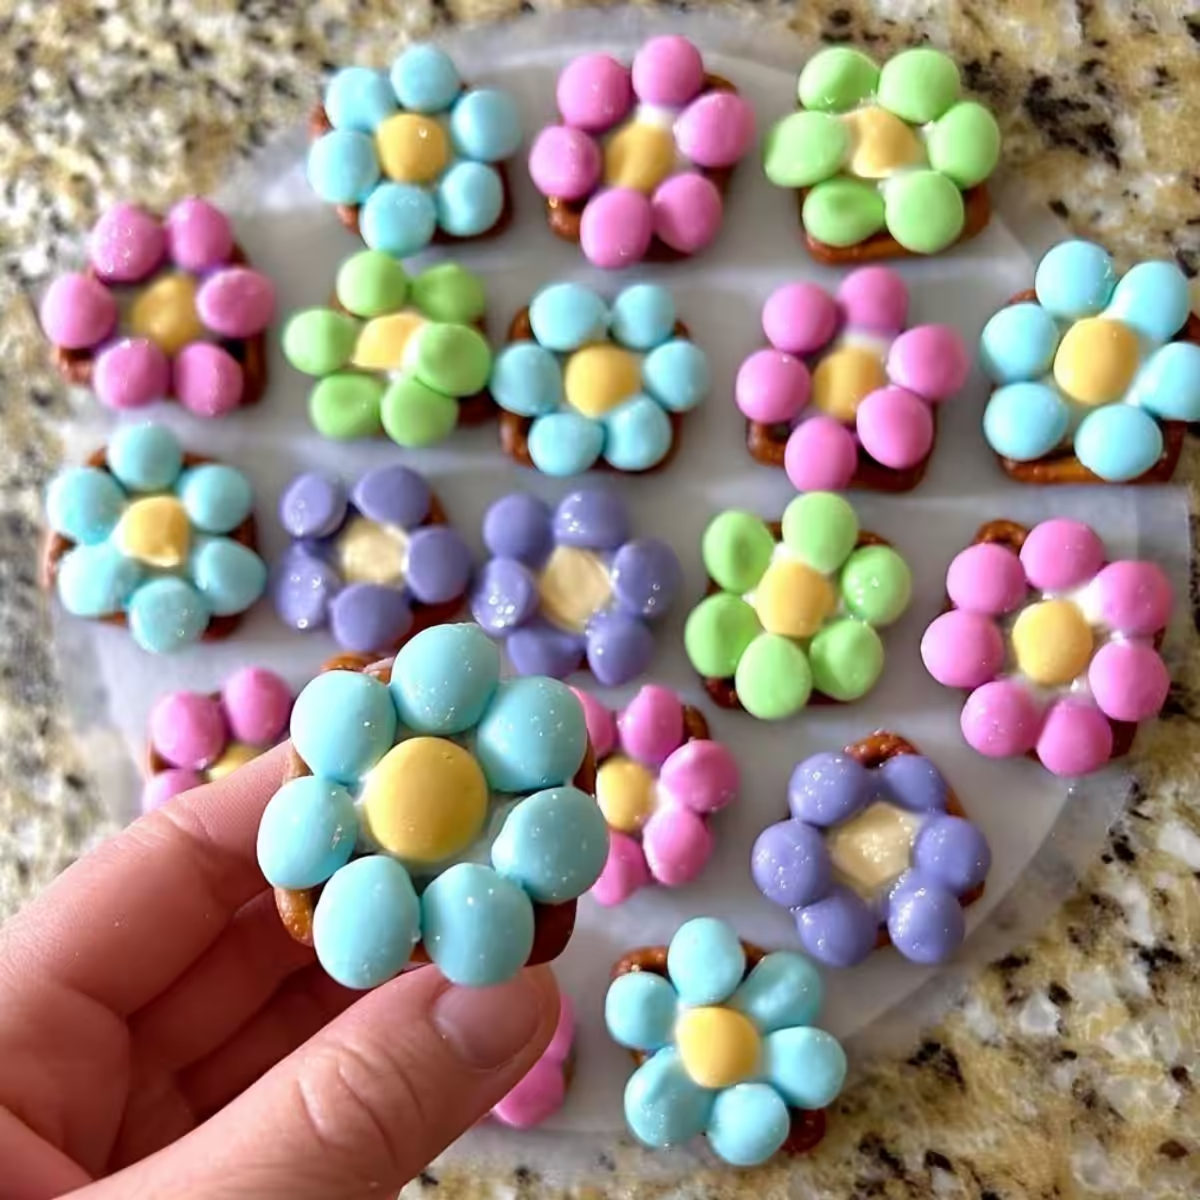

Pastel Flower Pretzel Bite
Ingredients
Equipment
Method
- Line a baking sheet with parchment paper or a silicone baking mat. Arrange pretzels in a single layer, spacing them about half an inch apart.
- Place candy melts or white chocolate in a microwave-safe bowl. Heat in 20-second intervals, stirring thoroughly between each, until completely smooth and melted. If using white chocolate, stir in coconut oil for a more fluid consistency.
- Divide melted coating into separate bowls for each color. Add gel food coloring a drop at a time, stirring until desired pastel shade is achieved.
- Using a small spoon or piping bag with the tip snipped off, carefully spoon or pipe melted coating onto each pretzel, filling the center and allowing it to spread slightly toward the edges. Work in small batches of 10–15 pretzels to ensure coating remains fluid.
- Immediately after coating each pretzel, gently press one or two flower sprinkles into the soft candy. Repeat with remaining pretzels.
- Allow coated pretzels to set completely at room temperature for 20–30 minutes, or refrigerate for 10–15 minutes for faster setting. Once firm, carefully lift from parchment and serve.