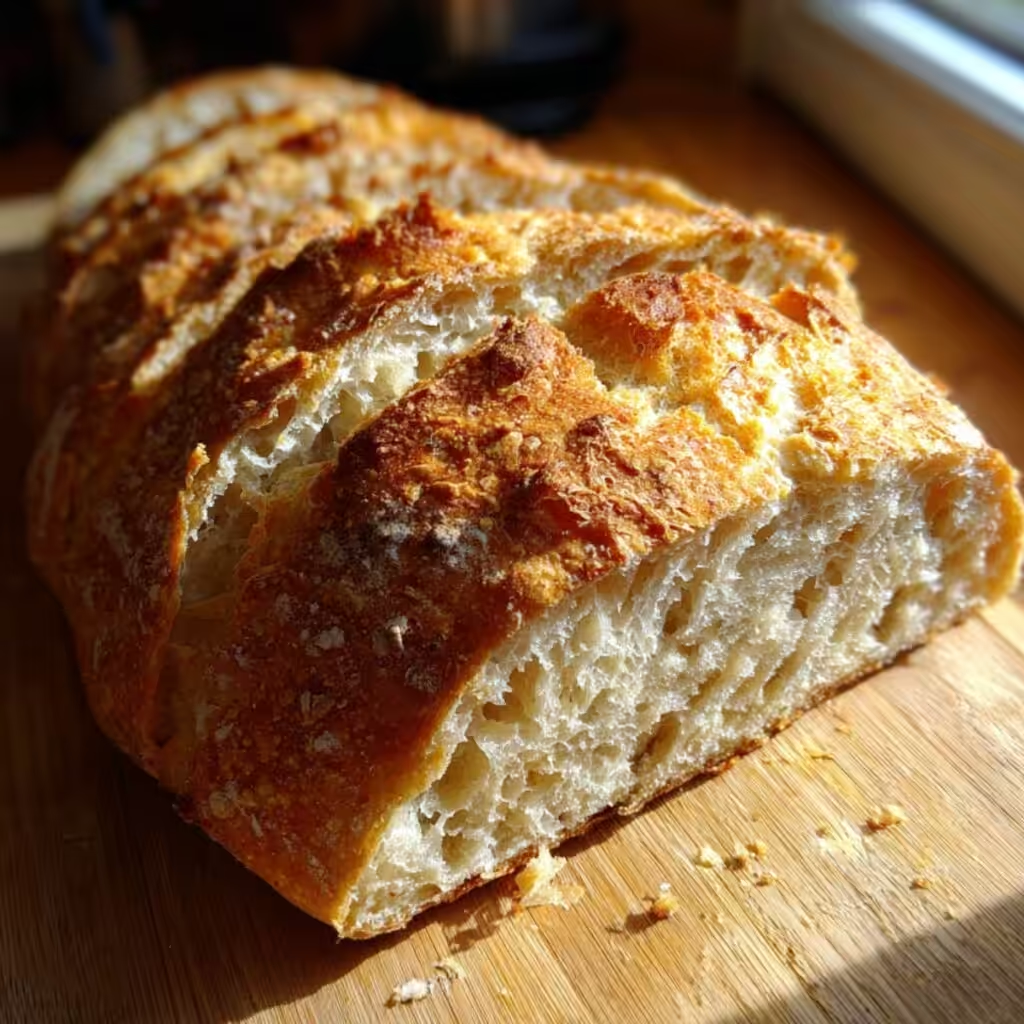
There’s nothing quite like the moment you pull a golden, crackly-crusted loaf of sourdough from the oven and hear that satisfying tap on the bottom. Inside is a soft, chewy crumb with an open, airy structure and a gentle tangy flavor that beats anything from the store. This Simple Sourdough Bread Recipe for Starters – Beginner Friendly delivers exactly that bakery-worthy result using just four everyday ingredients and zero complicated steps.

If you’ve always wanted to bake real sourdough but felt intimidated by feeding schedules, long kneading sessions, or mysterious “windowpane tests,” this is the recipe that changes everything. Designed specifically for first-time bakers, it relies on time rather than effort. Your active work totals less than 20 minutes, while the dough does the rest overnight. The result? A tall, beautifully risen loaf with professional-looking blisters on the crust and that signature sourdough chew. Thousands of new bakers have used this exact method to fall in love with homemade bread—and you will too.
Why This Simple Sourdough Bread Recipe for Starters Works So Well
The magic starts with your active sourdough starter—the living culture of wild yeast and beneficial bacteria that provides natural leavening and that unmistakable tangy flavor. Unlike commercial yeast breads that rise in an hour or two, this recipe uses a long, slow fermentation. During those quiet hours, the starter breaks down the flour’s starches and proteins, developing deep flavor while creating gluten naturally. No kneading required!
The high hydration (plenty of water relative to flour) gives the crumb its signature open holes and chewy texture. Salt strengthens the gluten strands and controls fermentation speed so the dough doesn’t over-proof. Together, these simple elements create structure, flavor, and texture without any fancy tools or experience. This is real sourdough science made beginner-proof.
Ingredients for Simple Sourdough Bread Recipe for Starters – Beginner Friendly
This recipe makes one beautiful rustic loaf (about 12 generous slices). Every measurement is tested for consistent success.
- ½ cup (100 g) active sourdough starter (bubbly, doubled in size, and passed the float test)
- 3 cups (375 g) all-purpose flour (or bread flour for extra chew)
- 1¼ cups (300 g) warm water (80–90°F / 27–32°C)
- 2 teaspoons (10 g) fine sea salt
Pro tip for beginners: Use a kitchen scale if possible—it takes the guesswork out of flour amounts and guarantees perfect hydration every time. If you only have measuring cups, spoon the flour in gently and level it off—never scoop directly from the bag.
Step-by-Step Instructions
Follow these five easy stages and you’ll have bakery-quality sourdough in your kitchen.
Step 1: Mix the dough (5 minutes)
In a large mixing bowl, combine the active starter and warm water. Stir until the starter mostly dissolves. Add the salt and stir again. Pour in all the flour at once. Mix with a sturdy spoon or your hands until no dry flour remains and you have a shaggy, sticky dough. It will look messy—that’s exactly right. Cover the bowl with a clean kitchen towel or plastic wrap.
Step 2: First rise (bulk fermentation – 8–12 hours)
Leave the covered bowl at room temperature (68–75°F / 20–24°C is ideal). The dough will slowly double in size and develop bubbles on the surface. This overnight rise is where all the flavor and structure happen. For best results, start in the evening and bake the next morning.
Step 3: Shape the loaf (5 minutes)
The next day, generously flour your countertop. Gently turn the dough out (it will be very soft). With floured hands, fold the edges into the center to form a rough ball. Flip it seam-side down and cup your hands around it, rotating gently to create surface tension. This shaping step gives the loaf its height and beautiful round shape.
Step 4: Final proof (1–2 hours)
Place the shaped dough seam-side up in a floured proofing basket, bowl, or cloth-lined colander. Cover and let it rest 1–2 hours until it looks puffy and has increased about 30–50% in size. It should feel airy when gently poked.
Step 5: Bake to golden perfection (45 minutes)
Place a Dutch oven (with lid) inside your oven and preheat to 450°F (230°C) for 30 minutes. Carefully transfer the dough to a piece of parchment paper. Score the top with a sharp knife or razor blade in a simple slash or X pattern—this allows the bread to expand beautifully in the oven. Using the parchment as handles, lower the dough into the hot Dutch oven. Cover and bake 20 minutes. Remove the lid and bake another 23–25 minutes until the crust is deep golden brown and the internal temperature reaches 205–210°F (96–99°C). Cool on a wire rack for at least 2 hours before slicing—this crucial rest sets the crumb structure.
Total active time: 20 minutes. The oven does the rest.
Pro Tips for Achieving Ideal Texture and Flavor
Master these simple techniques and your bread will rival any artisan bakery:
- Active starter is non-negotiable. Feed your starter the night before so it’s at peak activity. It should pass the float test: drop a spoonful in water—if it floats, it’s ready.
- Temperature matters. Cooler kitchens need longer rise times; warmer kitchens move faster. Watch the dough, not the clock.
- Handle gently. The more you stretch and fold during shaping, the better the gluten network and the taller the loaf.
- Scoring secrets. A confident, deep cut helps the bread “bloom” in the oven, creating those dramatic ears and blisters on the crust.
- Steam is your friend. The Dutch oven traps steam, which gives the crust its signature crackle and shine. No Dutch oven? Bake on a preheated baking stone with a pan of ice cubes below for steam.
- Don’t rush the cool-down. Slicing too early releases steam and makes the crumb gummy. Patience here rewards you with perfect texture.
These small adjustments turn good bread into unforgettable bread.
Delicious Recipe Variations and Easy Substitutions
This Simple Sourdough Bread Recipe for Starters – Beginner Friendly is endlessly adaptable while staying true to its beginner roots.
Whole Wheat Sourdough
Replace 1 cup of all-purpose flour with whole wheat flour. The loaf gains a nutty depth and slightly denser crumb—still 100% beginner friendly.
Seeded Sourdough
After shaping, roll the top in a mix of sesame, poppy, and flax seeds. The seeds toast beautifully in the oven and add wonderful crunch and nutrition.
Herb and Garlic Sourdough
Fold in 2 teaspoons dried rosemary or thyme and 3 minced garlic cloves during the initial mixing step. The aromatic flavor pairs perfectly with soups and roasts.
Sandwich Loaf Version
After the bulk fermentation, shape the dough into a rectangle and place it in a greased 9×5-inch loaf pan. Proof and bake as directed (no Dutch oven needed). You’ll get neat, even slices perfect for sandwiches.
Gluten-Free Adaptation
Use a gluten-free sourdough starter and replace the flour with 3 cups of a high-quality gluten-free bread flour blend (one that contains xanthan gum or psyllium). Increase water slightly to 1⅓ cups. The texture is softer but still delicious and chewy.
Easy Substitutions Guide
- No bread flour? All-purpose works beautifully—your loaf will just be slightly less chewy.
- Salt too strong? Use 1½ teaspoons for a milder flavor.
- Out of sea salt? Table salt is fine; reduce to 1¾ teaspoons because it’s finer.
- Want smaller loaves? Divide the dough after bulk fermentation and make two mini boules—bake 5–7 minutes less.
Every variation keeps the same easy timeline and forgiving method.
How to Serve Your Homemade Sourdough Bread
Serve slices warm with a generous spread of butter for the ultimate comfort experience. The crusty exterior and soft interior make it ideal for dipping in soups, topping with avocado, or turning into the best grilled cheese you’ve ever tasted. Toast day-old slices for incredible croutons or use in French toast (the tang cuts sweetness perfectly).
Pair it with pasta dishes, hearty stews, or simply enjoy as a standalone snack. Leftovers make the most delicious bread pudding or homemade breadcrumbs.
Storage and Make-Ahead Tips
Store your cooled loaf in a bread bag or wrapped in a clean kitchen towel at room temperature for up to 3 days. The crust stays crisp and the crumb stays soft.
For longer storage, slice the loaf once completely cool, wrap tightly in plastic, then foil, and freeze for up to 3 months. Thaw slices at room temperature or toast directly from frozen.
Make-ahead magic: After the overnight bulk fermentation, you can shape the dough and refrigerate it for up to 24 hours before baking. Cold dough is actually easier to score and often gives an even better oven spring.
Frequently Asked Questions About Simple Sourdough Bread Recipe for Starters – Beginner Friendly
What if my starter isn’t active?
Feed it twice a day for 2–3 days until it doubles within 4–6 hours and passes the float test. Patience here is the only “secret.”
Can I use all-purpose flour instead of bread flour?
Absolutely—your bread will still rise beautifully and taste amazing. Bread flour simply gives a slightly chewier crumb.
My dough seems too sticky—what did I do wrong?
Nothing! High-hydration dough is supposed to be sticky. Use plenty of flour on your hands and counter during shaping.
How do I know when it’s fully baked?
The crust should be deep golden and sound hollow when tapped on the bottom. An instant-read thermometer reading 205–210°F inside is foolproof.
Can I bake without a Dutch oven?
Yes! Use a preheated baking stone or sheet with a metal pan of ice cubes on the bottom rack to create steam.
Is this recipe vegan?
Completely! Only flour, water, salt, and starter—no animal products needed.
Final Thoughts on Your First Perfect Loaf
This Simple Sourdough Bread Recipe for Starters – Beginner Friendly proves that anyone can bake real artisan sourdough at home. The hands-on time is minimal, the ingredients are pantry staples, and the results are genuinely impressive.
From that first crackly bite to the last chewy slice, you’ll taste the difference that slow fermentation makes. Once you master this base recipe, you’ll be ready to explore all the delicious variations and become the family’s official bread baker.
Ready to start your sourdough journey? Grab your starter, clear a spot on the counter, and begin tonight. When your house fills with that incredible fresh-baked aroma tomorrow morning, come back and tell us in the comments how it turned out. Did you try the seeded version? The whole wheat? Share your photos, your tips, and your questions—I read every single comment and love helping new bakers succeed.
Bake your first loaf today. You’ve got this—and your kitchen is about to smell like heaven.


Simple Sourdough Bread Recipe for Starters – Beginner Friendly
Ingredients
Equipment
Method
- In a large bowl combine active starter and warm water. Stir until mostly dissolved. Add salt and stir again. Add all the flour and mix until a shaggy sticky dough forms. Cover and let rest.
- Leave covered at room temperature 8–12 hours (overnight) until doubled and bubbly.
- Turn dough onto floured counter. Gently shape into a tight ball creating surface tension. Place seam-side up in a floured proofing basket.
- Cover and proof 1–2 hours until puffy.
- Preheat Dutch oven to 450°F. Score dough, bake covered 20 minutes, then uncovered 23–25 minutes until deep golden and 205–210°F internally. Cool on wire rack 2 hours before slicing.